Rodent Control Austin: Let’s Set a Trap in 7 Easy Steps
 It has been quite a year in Austin. We had a good amount of rain, which is a nice change, and along with the central Texas heat pest control Austin companies have been busy. The whole industry has seen a busy summer and now that it’s starting to cool down, we will be changing our focus. Along with the temperature change, come new pest issues like rodent control Austin that need to be addressed. Pest control Austin customers are starting to deal with a good amount of rodent issues. As it starts to cool off all those rodents enjoying the mild weather outside are looking for more sufficient shelter. Some will find shelter in your attic. If you are hearing noises in the attic, you may have some unwanted squatters. When it comes to rodent control Austin customers are generally more than happy to leave it in the hands of a service professional, but a trapping program can get a little expensive. I often have homeowners ask me for information about how we would do the work; they want to try it themselves first. This is totally understandable, especially if you are fairly handy.
When working towards rodent control Austin companies have a somewhat basic approach to resolving the infestation. You want to trap for a couple of days, then close off any hole where rodents are getting in, then continue to trap for another week or so to make sure nothing was closed off inside. Sounds pretty simple right? It is, BUT you need to have a decent technique in order to have any results. Think about it like hunting, or fishing. Have you ever noticed that they don’t call it killing and catching? There are no guarantees but there are certain elements that you need to understand in order to have a chance at success. The first and most fundamental element is trap placement. I will be speaking about rat trap placement because this is the call I get most often.
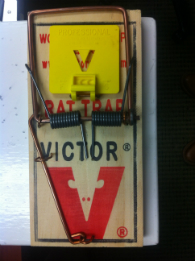
This is called an M-9 snap trap; this is a rat trap. You would use an M-9 to trap INSIDE a closed off area like an attic space. This is not to be used ANYWHERE a child, pet, in-laws, or drunken neighbor could come into contact with it. Ever. Period. Exclamation point!
Setting a snap trap is simple, but can really hurt if you aren’t careful. Here are 7 simple steps to follow during a trapping program.
- Put a small amount of bait on the bait plate. You can buy bait from manufacturers, or use some peanut butter. If you decide to use peanut butter, use a very small amount, the idea is that the rodent will have to reach over and put some weight on the bait plate in order to get some food.
- Cock the snap bar back and hold it. The snap bar is the spring loaded U shaped bar that will snap onto the unlucky rodent.
- Swing the control rod over the snap bar. The control rod will hook onto the bait plate. Bending the control rod will shorten it and make it more sensitive. It also increases the chances of crushed fingers so be extra careful if you’re feeling brave.
- Now the trap is set, you need to carefully let go of the snap bar. CAREFUL.
- Set the trap along an edge or along a runway up against a wall where you have seen rat activity. Place the snap trap so that it will snap towards the wall (Control rod away from you). Rats travel along walls and edges.
- Step 5 is super important so I will repeat it: Set the trap along an edge or along a runway up against a wall where you have seen rat activity. Place the snap trap so that it will snap towards the wall. Rats travel along walls and edges.
Snap traps need to be checked daily if possible or every 2 to 3 days. Be sure you know how many traps are set and where you set them. Continue to check the traps daily until you are done trapping.
